Using the Nexus 7 tablet to backup your photos to a hard drive isn't quite as easy as it could be, but it's not particularly difficult either. There are two main problems that need to be overcome - the Nexus 7 doesn't mount USB devices automatically, and the default permissions on Android 4.4 don't allow writing to the external drive.
To start off with, you'll need your Nexus unlocked and rooted. Sounds difficult, but it's not really. I followed this video, which shows you through the procedure:
On the latest version of android (4.2+), the developer options do not appear in the settings by default. You first have to go to Settings > About tablet, and then keep tapping on the build number until it gives you developer access. (After a few taps it will say You are x taps away from becoming a developer
and then count down the taps as you keep tapping).
You also need the program Wug's nexus root toolkit. The USB cable that comes with the Nexus can be used for connecting it to your PC. The whole process takes a while, but I find the Nexus root toolkit does a good job of guiding you through each step and doing many of the tasks needed automatically.
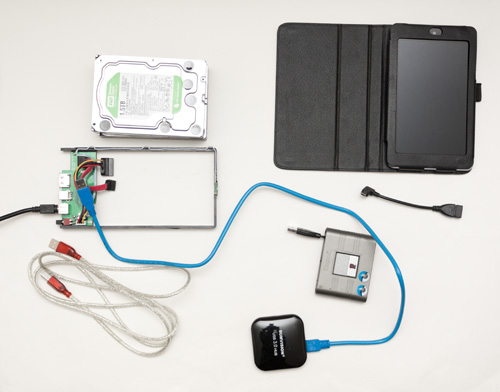
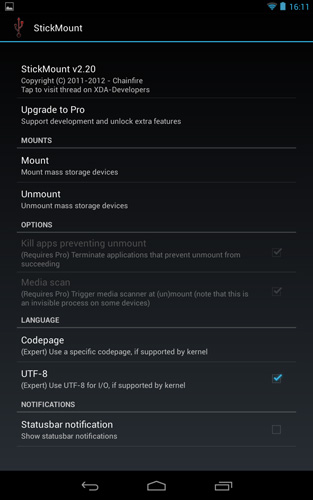
Once you have completed the procedure in the video above, you can install the stickmount app. This allows you to mount external USB devices. You also need a USB OTG (On The Go) cable for connecting USB devices to the Nexus' micro USB port. These are pretty cheap, I bought mine from an Amazon marketplace vendor.
You will also need a USB hub so that you can have both your card reader and hard drive plugged into the Nexus at the same time. If you have an external hard drive that draws power from the USB connection (i.e. it doesn't have a separate power cable), you might want to get a powered USB hub. The Nexus 7 USB port does not allow as much power draw as a laptop or standard computer, and it may not be enough by itself to power a hard drive.
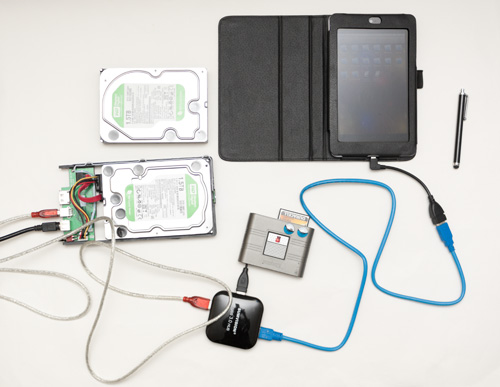
For the hard drive, I use two standard internal 3.5" hard drives. I have the insides from an external hard drive caddy that I can connect the drives (one at a time) into. I don't use the caddy case as it adds (unnecessary in my opinion) weight and bulk. You can buy just the SATA to USB connection block on eBay (just search for SATA USB).
To allow writing to the drive, you need to install the SELinux Mode Changer app and then use this app to change the SELinux permissions to permissive. Alternatively, the ParagonNTFS app can also modify the SELinux permission, but given that none of the ParagonNTFS features are needed, the SELinux Mode Changer app seems a better choice to me. (Previously the ParagonNTFS app was needed to be able to mount an NTFS formatted drive, but Android can now read NTFS formatted drives without the need for a special NTFS mounting app).
You will also need a file manager app to copy the files, for example ES File Explorer File Manager or Solid Explorer).
On to the actual copying process. Make sure the Nexus is on. Plug the USB OTG cable into the Nexus, and then connect the USB hub to the OTG cable. Plug the card reader (with card already inserted) into the USB hub. Plug the USB hard drive into the hub as well, and switch the drive on. (I don't think it actually matters in what order you connect everything up).
A notification should pop up on the nexus asking if you want to open stickmount, so click OK. Stickmount will mount the memory card and hard drive so you can access them from the Nexus. If you get a Super user request for stickmount, make sure you choose 'Grant'.
If Stickmount isn't prompted to be opened automatically, you can open it from the apps area and then use the app interface to mount devices.
Now we have the card reader and hard drive mounted, we can copy the files. Go to your file manager (ES File Explorer).
Open the folder usbStorage. If you have a multi card reader like me, then there will be several folders in there - one for each card slot in the reader. There will also be a folder for your hard drive. Just open the the different folders until you find the one for your card (it should have a 1 at the end like sdb1).
Find the folder for your memory card (in my case usbStorage/sdb1), open it and find the folder that contains the photos (e.g. 100_FUJI).
Now, there is an issue with the current version of android on the Nexus 7 - it will only let you copy as much as the free space on the device. Don't ask me why there is this limitation, this limitation didn't exist previously and has been introduced in one the android updates.
In my case, my device only has just over 4GB free space, and I am copying from a 32GB card. This means that I can't just select to copy the folder of images from the SD / CF card as the size will be greater than the 4GB of free space I have and would give a 'not enough free space' error. So I have to open the folder and then copy around 4GB of files. Then when they've copied, select the next 4GB of files and copy those, etc.
It's much more inconvenient than it used to be when you could just copy across a whole memory card in one go. But at the same time, it's not really a deal breaker for me. You just need to keep an eye on the copying process so that you can start copying the next batch of files when the first batch is done.
If it is a deal breaker for you, then it is probably possible to revert to an older version of android that doesn't have this problem.
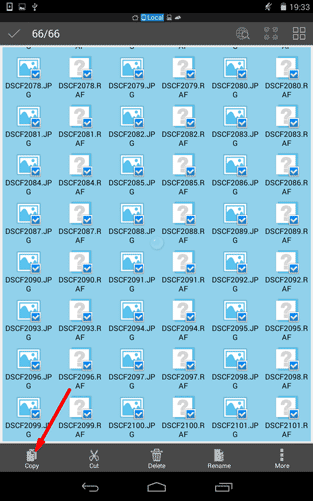
To select a group of files you need to press and hold on the first file you want to select. This should put ES Explorer in selection mode and show a tick on the file you just selected.
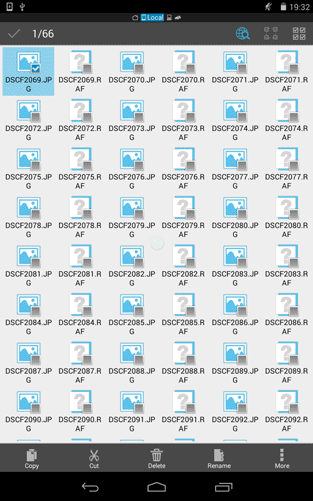
Now scroll down to the last file you want selected and press that to select that too. Then at the top right of the screen press the select all between button.
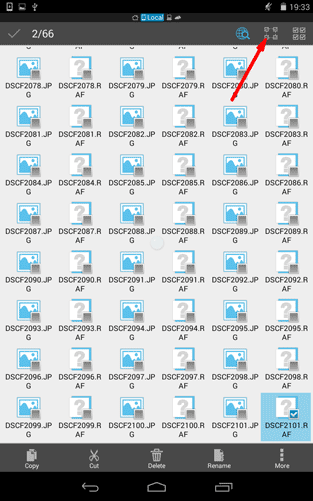
This will select all the files between the first and last files you selected. It's the same as Shift-selecting files in Windows. With the files selected you can then copy them.
But hang on, you might be thinking, how you do you know how many files to select to copy without accidentally selecting more than the free space on your device? The answer is just a bit of experimentation.
Select the first file, then scroll down a specific number of screens and select the last file on that screen. You can then either try copying these (see below) and see if they will copy okay. Or press the ⋮ button at the bottom of the screen and choose properties from the menu. This will give you the total size of all selected files, which you can use to tell if it is more or less than the free space on the device.
If you've selected too many files, then you know that you need to scroll less screens when making the selection. On the other hand if you've selected less files than the free space, then you know that you can scroll more screens when making the selection. In my case I found that I could scroll down 6 screens to select around 4GB of files.
Alternatively, if your device has more free space than the capacity of your memory card, or you're using an older version of android, then you can just copy the folder from the memory card containing all the photos and not worry about any of that. Press and hold on the folder to select it. You can now choose to copy the selected folder.
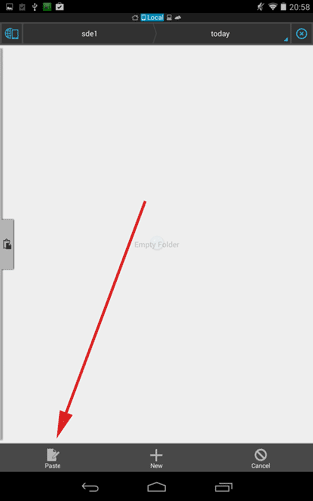
After copying the files, browse to the folder where your hard drive is mounted (in my case usbStorage/sde1). On first copy you will probably want to create a folder here to store your day's images in. After doing that you can enter the new folder and press the paste button to copy the files there.
You should now see a dialog showing the copy progress of the current file as well as the entire copy job. This is a nice feature that used to be missing in ES Explorer - it used to only show the copy progress per file so you had no idea how far through the copy it was.
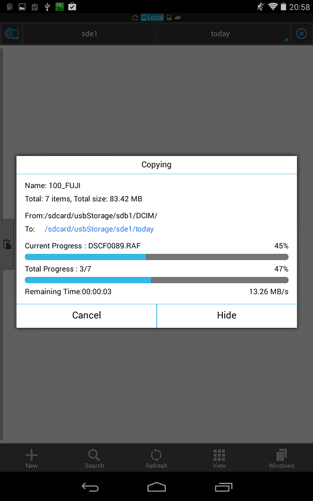
Note that the Nexus is only USB2, so copying speeds won't be very fast.
It is a good idea to make sure that the Nexus will not hibernate while it is copying. To do this, go to the main settings and change the display settings to only switch off after 30 minutes.
When the copy is near finishing it is a good idea to watch it so that you can check the filename of the last file copied. You then know that you need to start from the next file on for your next selection of files to copy. If you miss this, you'll just need to scroll down to the end of the folder you've just copied to and note the filename of the last file in there.
When you've copied all the files and you want to start copying from the next memory card, go to stickmount. Click on unmount. When it says it has unmounted the devices, take the memory card out of the card reader. Put your next memory card in the card reader. Either stickmount will automatically mount the reader again when the new card is inserted, or you can click mount in stickmount to mount it.
Go back to ES File Explorer and now you can copy this card to the hard drive. You might need to press the refresh icon to make it refresh the folder view with the new card's contents.
After copying all your cards to the hard drive, you can switch to the second hard drive. In Stickmount click unmount. Be sure that the copy has completely finished before you attempt unmounting or unplug your hard drive or memory card.
Switch the hard drive off and swap with your second hard drive. Switch on the second hard drive and mount it using stickmount.
Repeat the card copying process as before. Repeat the same unmounting process before you remove your hard drive as well.
The copying process can take a quite a long time when you are copying multiple cards and to more than one hard drive. So it is best to make sure that your Nexus is fully (or nearly fully) charged before you start. The Nexus uses the micro usb port for charging, so you can't have it powered while you are copying files.
If you're using the Nexus for copying files while you're away from home, then don't install any android updates to your Nexus while you're away. The updates will likely remove the root privilege, and so you would need to re-root the device after the update to be able to continue mounting your card reader and hard drive.
Updating is best done when you're at home and so can use the Nexus Root Toolkit. Then you can root the device again after it's updated.
For viewing RAW photos after copying them to the hard drive, I did use an app called RAWdroid. However, after an update it stopped working properly for me.
I now use Photo Mate R2, which includes a range of RAW adjustments. My understanding is that it is like a mobile version of Lightroom, though I don't use Lightroom, so I can't really say how it compares. Below is a video that gives a good comparison against Lightoom from someone that does use it:
For editing JPEG photos, a couple of other apps you may want to consider are Nik's Snapseed and Photoshop touch. I tried the Snapseed app once and thought it was okay, but I don't tend to process images on my tablet. When I'm on holiday I'm either out and about, eating, sleeping, travelling or copying the images, so I don't have time for processing images. (I don't generally use the tablet much when travelling since it uses the battery up and I would then need to wait a few hours for it to charge up again).
I hope this article helps anyone who is looking to use the Nexus 7 as an alternative to a laptop when travelling. But do note that this article was written for the Nexus 7 running android 4.2.2. I've already had to revise the article several times due to android updates changing the process needed, and no doubt future updates will mean the process needs changing again.
Very helpful Thank You fr your time
How did you get this to work for Android 4.2 when the Paragon program states it does NOT work with that version of Android?
There sure is a lot of junk information out there that doesn’t apply after 4.2 yet no one bothers to correct it.
Hi Longjohn
Thanks for the info! I just tried again with Android 4.2.2 today, and it seems that Paragon NTFS is no longer needed. The NTFS partition is mounted okay by stickmount and can be written to without the Paragon app installed. So the process is a bit simpler now than it was before. I’ve added a note to the start of the article to this effect.
Cheers
Dave
heya!
i’ve followed the instructions and successfully allowed myself root access to all of the programs and i am very grateful for the help you’ve provided 🙂
i’m just wondering if there is anyway i can now copy data off the Nexus 7 and onto something like a USB drive or external HDD to give myself additional storage space to back up my photos?
Cheers!
Russ
Hi Russ
Yes, you can use the same process as above to files directly from the Nexus’ built in storage to an external drive. Just use ES File Explorer to browse to the files you want to copy, select and copy them, then browse to the correct usbStorage folder and paste them in there.
Dave
Hi,
Thanks for the write-up! I have a few questions:
1. Have you used this setup with a portable USB hard drive? To power a portable drive, I’m assuming you would have to buy a USB splitter and inject power.
2. Do you know the approximate transfer rate from your CF card to the hard drive? I’ll need to copy large video files, so it would be nice to estimate how long the transfers will take.
3. What CF reader and hub are you using?
Thanks!
Seth
Hi Seth
1. I haven’t used this setup with a USB powered portable hard drive. I have read that whether this will work or not depends on the power draw of the hard drive, as the nexus 7 doesn’t put out as much power over USB as a laptop or computer would. If you use a powered USB hub, then this will provide enough power for the drive.
2. I’ll have to do a test on that and get back to you. I can tell you that it is pretty slow though.
3. I’m using a Sumvision USB 3 hub (Nexus 7 is only USB 2 though, so there are no speed benefits from using a USB 3 hub). For the CF card reader I’m using a Kingston multi-card reader. Any USB 2 hub and CF card reader should be okay though.
Regards
Dave
I’ve done a speed test now, I did the test once using the Nexus, and then another test using the same drive, cables etc. but attached to my PC instead of the Nexus.
Copying a folder of 288 files, 3.73GB in total: Nexus 8 mins; PC 4 mins 37 secs.
Copying a folder of 1 file, 3.81GB in total: Nexus 7 mins 14 secs; PC 3 mins 14 secs.
So the Nexus is nearly twice as slow as my PC at copying files from a memory card to an external hard drive.