What is Auto Bracketing?
Auto bracketing (or exposure bracketing to be more precise) means that you set your camera to take multiple images with different exposures. Generally you would set the camera to auto bracket 3 images at ±1ev. This means you get one image underexposed by 1 stop, your normally exposed image, and then one image overexposed by 1 stop.
It is also possible to bracket other camera settings, such as White Balance, but generally when someone refers to auto bracketing, they mean bracketing exposures.

Most DSLRs have a dedicated Auto Bracket button
How digital cameras work out auto exposure (a very brief overview)
Before I go into why I always use auto bracketing, here's a quick brief on how digital cameras decide to expose the image when you are using an Auto mode (Aperture Priority, Shutter Priority, or Program Mode).
Traditionally Cameras' meters would be set so that the average Luminance of a scene would be equal to Middle Gray. This meant that if the scene you were photographing was quite bright e.g. snow or the sun shining through clouds, the photograph would come out quite dull and underexposed. Of course, you'd also get the opposite problem when shooting a dark scene.
Nowadays digital camera meters are much more advanced and actually have a database of scenes with appropriate exposure values programmed into them. When metering a scene the camera looks at its database to try and find the correct exposure based on a scene similar to what it thinks you are photographing. The Wikipedia article on Metering Modes covers Multi-zone metering in more detail if you are interested.
Still, even with the sophisticated methods that modern digital cameras can use to determine the correct exposure for a scene, you'll often find that a scene is either too dark or too bright. This is why I auto bracket all my images.
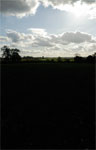
, thus making the rest of the photo quite dark.")
You can see in this photo the camera metered for the sky (which contains the bright sun), thus making the rest of the photo quite dark. Actually, in this photo I quite like the effect.
How to set Auto bracketing on your digital camera
Setting Auto Bracketing depends on your camera model, in my Canon 450D DSLR you have to go into the Shooting menu to set it, while my Nikon D200 DSLR sets Auto Bracketing by pressing a dedicated button and using the thumbwheel to change the Auto Bracketing settings.

On some digital cameras you will need to go into the menu settings to set Auto Bracketing
The benefits of exposure bracketing are:
-
I find that sometimes images look different on my monitor to how they display on my digital camera's LCD. Sometimes they will look brighter on the camera's LCD, sometimes darker, it depends on the lighting conditions. In bright sunlight I can't actually see the images on the camera's LCD at all (if you have one of the latest cameras with anti-glare screens this may not be such a problem). Thus, the inability to judge a correct exposure on the camera's LCD is somewhat negated by auto bracketing since you should have the bracketed images to choose from when get home to view them on your calibrated monitor.
-
Sometimes you don't have time to chimp an image straight after taking it, or maybe you are photographing a short-lived moment that you might otherwise miss if you have to take a shot and then adjust your exposure because the camera's meter didn't get it right. Assuming your camera's meter wasn't way out on calculating the exposure, by bracketing your images you should still have a correctly exposed image to choose from.
-
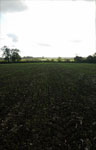
Often (in the UK at least) a digital camera doesn't have enough dynamic range to record a scene as your eye sees it. In your photos you will normally find that either the sky is a blown out white while your subject (the countryside) is exposed properly, or the sky will be exposed properly and your subject will be very dark. If your digital camera decides to expose for the sky, by auto bracketing your images, you should end up with one dark image, one image exposed for the sky, and one image exposed for the countryside. Likewise, if your camera decides to expose for the countryside you should end up with one image exposed for the sky, one image exposed for the countryside, and one image over-exposed. Either way, you should end up with one image exposed for the sky and one image exposed for the countryside.
What you can then do is take the image exposed for the sky (as this will normally be the brightest part in any image), and then pull up the exposure in the shadows to get the countryside exposed correctly. Alternatively you may find you need or want to use Exposure Blending or HDR to merge the exposures into one 'correctly' exposed image.
UPDATE 12th December 2009: I have now posted a full tutorial on the process of Exposure blending to increase the dynamic range of an image.

EV -1.7
EV -0.3
EV +1.7
")
Combined image
The disadvantages of exposure bracketing are:
-
It uses up more storage since you record 3 images for every one image you take. With the cost of Memory cards and Hard drives today, this isn't too much of a problem though.
-
For action shots if you have Auto bracketing turned on, you'll probably end up with one underexposed shot, one correctly exposed shot, and one overexposed shot. Whereas with Auto bracketing off you can just fire off as many shots for as long as you hold the shutter down or until your camera's buffer is full.
Obviously, if you know you're going to be shooting action you wouldn't have Auto-bracketing turned on, but it can be a problem if you have Auto Bracketing on and then come across an action shot unexpectedly (normally some wildlife running away from you).
Why I like to use exposure bracketing
For me, I always use auto-bracketing when photographing landscapes for the three reasons I stated above - the camera LCD not being accurate, not having enough time to fine-tune exposure in the field, and the camera not having enough dynamic range to capture a whole scene as I see it most of the time.
For controlled lighting situations (e.g. anything using Flash) Auto Bracketing should not be needed.
Do you use Auto Bracketing, and why do you use or not use it? Any questions about using Auto Bracketing or anything else photography related?
Let me know in the comments below!
Dave
At present I use Pana Lumix DMC-LX2 which has auto bracketing facility. I am considering upgrading to Canon 5D mark 2. I have been unable to determine whether this Canon has auto bracketing facility. Can you help, please?
Hi Ronnie
I don’t have a 5D Mk II, but my understanding is that you can bracket 3 images up to +/- 2.0 EV, and the bracket amount can be set in 0.3 or 0.5 EV increments. (So yes, it does have auto bracketing).
Hope that helps.
Dave
What is the best software to use for auto bracketing. I have a Canon 60D and I’ve been experimenting. I did a few auto brackets in my HDR Software but is there software that just merges the bracketed photos or does it have to be done in HDR ?
Personally I manually blend my bracketed images together using layer masks in Photoshop and use Photoshop’s auto align feature for aligning bracketed shots taken handheld. You can see the process I go through with an image at: Exposure blending to increase the dynamic range of an image.
Bracketed photos can also be blended without HDR automatically, this method is known as exposure fusion. Photomatix offers both HDR and Exposure fusion, while EnfuseGUI is a free exposure fusion software.
Thank you. I will try that software. My HDR Software will not blend exposures without applying the HDR effect. Its cool sometimes but most times I like a more natural effect. Just got a new Canon 17-55mm 2.8 and can’t wait to start experimenting.
Thanks again !
i have been using point and shoot and now i am ready to upgrade.
i have a number of questions.
a. shud i go for dslr or try mirrorless. my photography expert friend said ……dslr
b. i was disappointed to read that video shooting is not that good in dslr coz video continuous auto focus is a problem….and audio might catch the lens focusing noise.
c. now amongst dslr, i have to decide between d3200 and d5100. both cost same. difference is d3200 is 20% lighter in weight, has expeed 3, 24 mpixels, wifi, guide mode and so on, while d5100 is time tested, it has auto bracketing, screen tilts and adjusts and so on. which one to go for.
what am i looking for?
well….i was looking for a device to shoot both video and pics…..but after reading that videos wont be that great…..nw i am looking for nice pics…..i have a research mind….and i tend to like the idea of bracketing. this gives me more chances of getting the perfect shot coz i wud be getting 3 shots. now right here i wish to clarify…..is it dire necessity to have a tripod to shoot those 3 pics….i am told ….all 3 shud be taken without shaking camera….i wont use tripod……but i can try to keep hand stable. like i said…i did like the idea of having one over and under exposed shot. now the software that comes with the nikon….will it be enough to do the editing for final pic on laptop or will i have to purchase another software.
what i like in d3200 is light weight, guide mode and so on…..but i dont know…..if d5100 is technologically more advanced.
last thought…..d3200 is recently launched while d5100 is old and therefore d5200 is expected. but i guess it will be significantly more than d5200……may be it will be too costly for me. so lets stick to 700usd mark and decide between d3200 and d5100.
kindly guide.
thx
k
It is not a strict necessity to shoot bracketed images on a tripod, but if you shoot handheld, then you need some software that will align the handheld images correctly. I use Photoshop’s auto align feature, I believe Photomatix can also align handheld images automatically.
Software can’t always align the images correctly, which is why it is generally better to use a tripod if possible. Personally, the majority of my bracketed and then blended photos are shot handheld with no tripod.
I am 90% sure the software that comes with the camera is pretty useless for anything other than doing a basic RAW conversion. If you want to blend bracketed shots, particularly handheld ones, then you’ll have to fork out for some more expensive software. Possibly the GIMP (free) would be okay, but I don’t have any experience with that program. Aligning the handheld images may also be able to be done using panorama software like Hugin (free).
The other thing to note is that the D5100 is known for having a good dynamic range (and likely the D3200 will be as good or maybe better). So there is less need to bracket shots – you can take a single shot exposed for the highlights, then pull up the brightness of the shadows to reveal more shadow detail.
Personally I would rather have the D5100 than the D3200, both for the bracketing, and also the articulated screen. I’m sure both are good competent cameras though.
Dave
Sir I am using a Canon 450D camera and I am unable to shoot in the dark in all the settings,pleasr help.
Thank you
Hi David
Do you mean the camera can’t autofocus, or are pictures are coming out blurry, or are the pictures too dark? It’s difficult to give much advice without more specific information on what you mean by being unable to shoot.
Dave
Hi, I am having trouble with my nikon d5100. It is bracketing automatically, even when I don’t hold down the shutter. For every three pictures, even if they are of diffferent things, it still is bracketing them. The first one will be underexposed, second normal, and third, overexposed. I do not want to be auto bracketing every time I shoot, and Im having trouble making it so that sometimes its on, sometimes its off. Any suggestions?
Hi Rick
It depends on your camera model, but with some models once you have set the camera to exposure bracket, it will always bracket all your shots until you turn bracketing off. I don’t have a D5100, but with my D200 if you have your camera set to single shot drive mode and bracketing turned on, then it will behave as you describe.
So, all you need to do is to turn bracketing on when you want it, and then remember to turn bracketing off when you don’t want it. I’m not quite sure how exactly you turn bracketing on / off with the D5100, but the manual should tell you if you’re not sure.
Hope that fixes it
Dave