In this post I'll cover two main points:
- Does adding the protective plastic over the flash head when performing a full spectrum modification to the Vivitar 283 flash reduce its UV output compared to having it bare?
- How well does the Convoy S2+ Nichia LED 365nm UV torch / flashlight work for reflected UV and UV induced visible fluorescence photography?
And also compare the difference between flash and the torch for reflected UV photography.
Reflected UV test with flower
Unfortunately I couldn't easily find any flowers with UV markings, so I just went with a Chrysanthemum flower that was available. All photos were taken at ISO400 and f/5.6 using the 80mm/5.6 EL-Nikkor. A Baader U Venus filter was used to restrict the captured light to UV only. The flash and torch were held the same position and distance away from the subject.
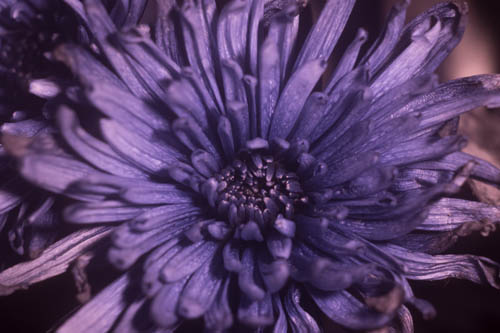
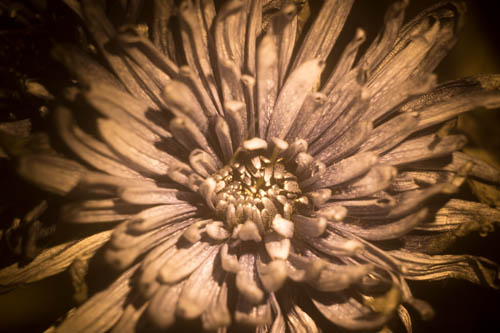
1/160s, Full spectrum Vivitar 283 flash with protective front plastic piece in place

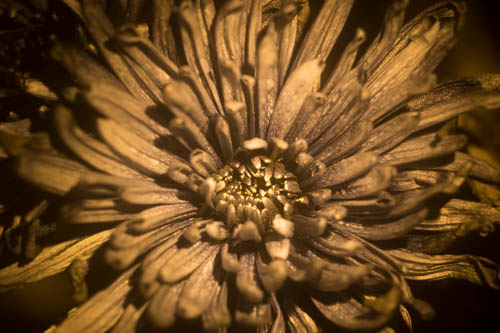
1/160s, Full spectrum Vivitar 283 flash with protective front plastic piece removed
The plastic protector is just a piece of clear plastic cut from an old CD case that I use to replace the flash's UV blocking fresnel lens. Adding a piece of plastic rather than leaving the front of the flash open helps protect the flash bulb from any knocks, which could break it.
The plastic causes around half a stop of light loss. This might not seem like a lot but with UV you really need all the light you can get. Shooting without the plastic is equivalent to adding another flash firing at half power.
Still, I'll keep using the protective plastic on mine as I don't want to risk breaking the flash bulb.
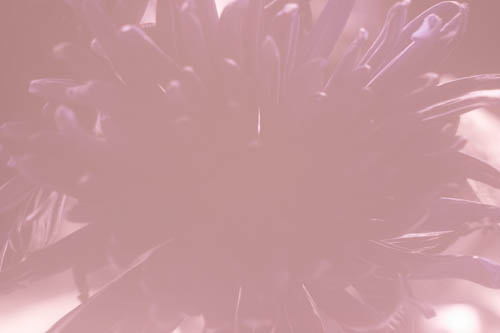
25s, Indirect natural light
This probably wasn't quite a fair test for natural light as the flower was more backlit than front lit. But as you can see, indirect sunlight results in a washed out image and a very long exposure time was needed to gather enough light to create the image.
1/5s, Convoy S2+ Nicha 365nm UV torch with glass protector in place
What's immediately obvious here is the difference in colour from the other images. However, there are also tonal differences - the centre of the flower is quite a bit brighter while the edges are darker in the torch image.
This is likely down to the torch having a much brighter centre and fading in brightness towards the edge of the beam. Whereas the lighting from the flash is much more even. Possibly a different reflector in the torch could help.
If you compare the shadows, you can also see the flash gives softer lighting as it is a larger light source than the torch.
The shutter speed has to necessarily be a lot slower due to the torch being a constant light source rather than the quick blast of light you get with the flash. With the flash you're getting an effective shutter speed around 1/1000s (the flash duration), considerably faster than what's needed for the torch.
This makes the torch only really useful for controlled working conditions where there's no wind. Whereas the flash can be used for outdoors photography as the fast duration freezes the subject and prevents motion blurring.
1/5s, Convoy S2+ Nicha 365nm UV torch with glass protector removed
Removing the protective glass (or it might be plastic) from the front of the torch yields a very small increase in brightness, but less than one third of a stop so far as I can tell.
1/5s, Convoy S2+ Nicha 365nm UV torch with ZWB2 UV pass filter
GearBest, who I bought the torch from, also offer a ZWB2 filter. This passes light from around 300 - 400 nm, cutting visible light. It passes IR light also, but since the torch doesn't generate IR light this doesn't matter.
Using this filter causes around one third of a stop of light loss. Looking at the transmittance graph for the filter, it appears optimised for 365 nm, peaking around that wavelength with 85% transmittance. So this would indicate that the vast majority of light the torch is putting out is around 365 nm, else we would expect to see a bigger drop in brightness with the filter.

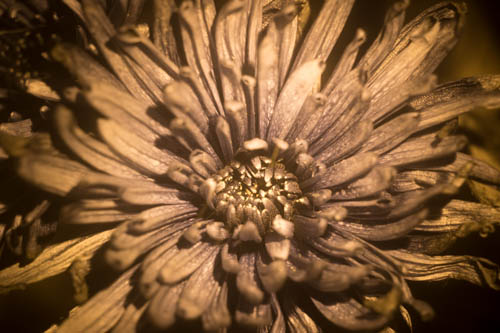
8s, Ultrafire G60 3w 365nm UV torch with 330WB70 UV pass filter
Finally, we have my Ultrafire torch that I tested previously against some very cheap UV torches: Cheap UV torches - flashlights for UV induced fluorescence comparison. The colour and tonality is nearer the flash than the Convoy torch. This may be because the Ultrafire torch has a larger head.
But the LED used in the Ultrafire torch outputs very little UV compared to the Nichia LED used in the Convoy torch. The Nichia is around 7 stops brighter, which is a massive difference.
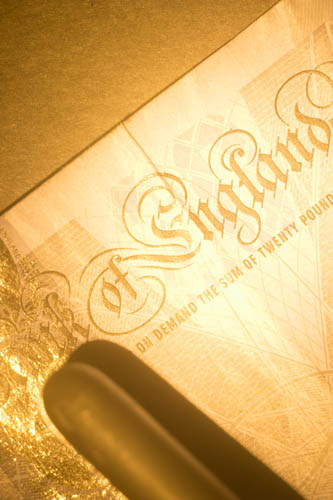
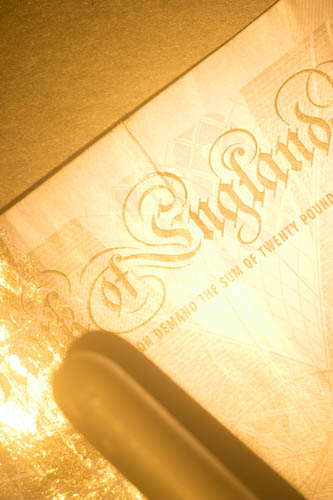
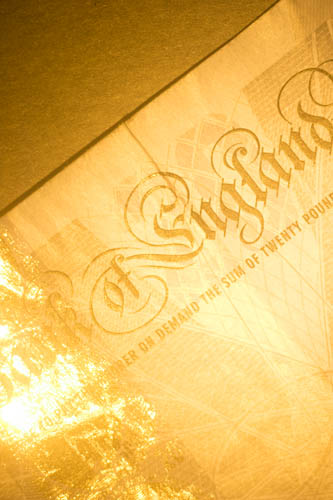
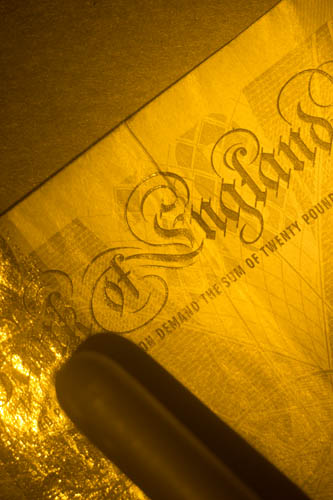
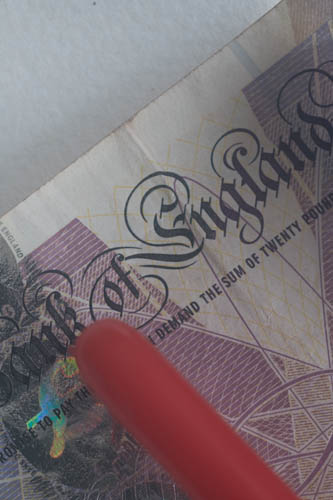
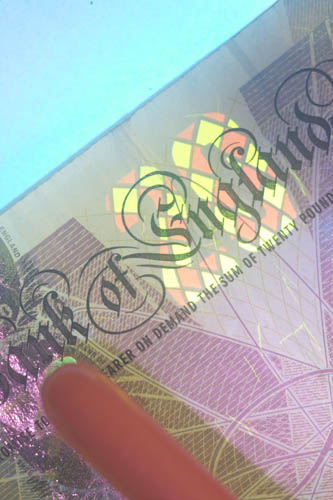
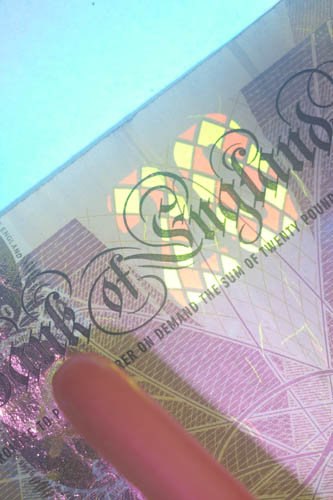
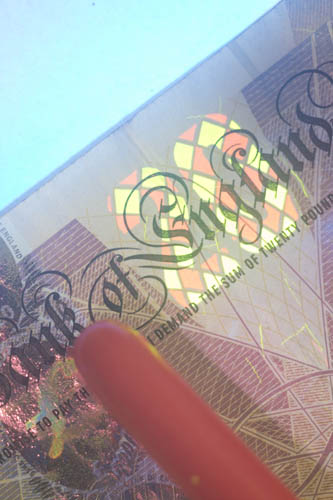
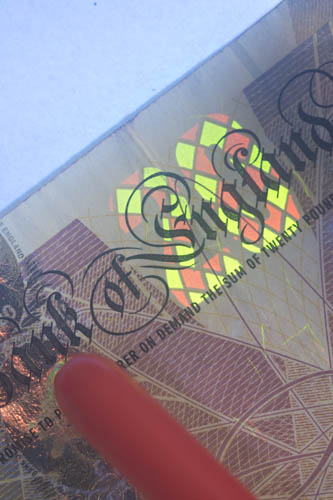
Reflected UV test with banknote
This test was similar to the one with the flower. Aperture was set to f/5.6 and ISO 200. A Baader U Venus filter was used to restrict the captured light to UV only.
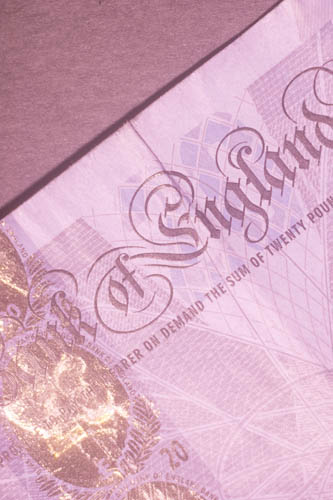
1/160s, Full spectrum Vivitar 283 flash with protective front plastic piece in place
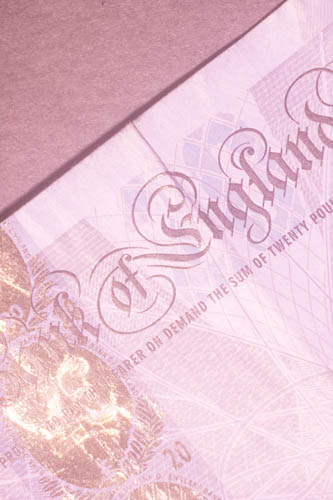
1/160s, Full spectrum Vivitar 283 flash with protective front plastic piece removed
1/10s, Convoy S2+ Nicha 365nm UV torch with glass protector in place
1/10s, Convoy S2+ Nicha 365nm UV torch with glass protector removed
1/10s, Convoy S2+ Nicha 365nm UV torch with ZWB2 UV pass filter
The images above just show the same things I saw in the flower test.
1/10s, Convoy S2+ Nicha 365nm UV torch with 330WB70 UV pass filter
Using the Convoy torch with the 330WB70 UV pass filter that I had purchased for use with the Ultrafire UV torch gives around 1.5 stops loss compared to the clear glass. For UV only use this filter is not needed (not to mention it's too large to insert as a front glass on the Convoy and must be held manually on the end of the torch).
UV induced visible fluorescence test with banknote
These were all shot at f/5.6, 1/10s ISO100. I still used my full spectrum camera but a B+W 486 UVIR cut filter was used to restrict the captured light to visible light only.
natural light only
Convoy S2+ Nicha 365nm UV torch with glass protector in place
Convoy S2+ Nicha 365nm UV torch with glass protector removed
Convoy S2+ Nicha 365nm UV torch with ZWB2 UV pass filter
Convoy S2+ Nicha 365nm UV torch with 330WB70 UV pass filter
I tried to white balance each of the images as best I could, using the £20 note. The part at the top of the image is some white card, which fluoresces blue.
The Convoy torch does seem to output some visible violet light. This isn't reduced that much by the cheap ZWB2 filter, but is attenuated by the much more expensive 330WB70 filter.
Conclusion
Using clear CD plastic to replace the UV blocking fresnel lens of a flash does block some UV light. At half a stop UV light loss I think the trade-off is worth it for keeping the flash tube protected.
The Convoy S2+ Nichia LED 365nm UV torch / flashlight is a very nice and powerful (compared to most other options) UV light source. The price seems to vary a bit, but it is far less than any of the Nichia UV torches previously have been. I've actually ordered another one now so I'll have double the power.
I paid $18.49 for my first torch, and $20.99 for the second one. The ZWB2 UV pass filter for the torch was $1.22. And 2 18650 batteries and charger cost me $5.79. I bought them all from GearBest.com.
As well as UV induced fluorescence, the Nichia UV torches are also useful for adding enough UV light to a subject so that focusing in liveview can be used. Then flash can be used for the actual image.
In terms of the colour differences between reflected UV photos taken with the flash and torch, I need to do some more testing on this front. Colour isn't really important in UV photography since it is false colour. But there must be a reason for the difference in colour.
“Colour isn’t really important in UV photography since it is false colour. But there must be a reason for the difference in colour.” – visit my review of the Convoy S2+ to learn why color is important to mineral collectors – https://www.naturesrainbows.com/single-post/2017/03/01/365nm-Flashlight-Torch-The-Most-Significant-Innovation-in-UV-Mineral-Lights-in-Years
Mark, I think you’re talking about something completely different – UV induced visible fluoresence, while I’m talking about reflected UV light.
http://www.savazzi.net/photography/uv-b.html
The link above explains the different colors registered by digital camera sensors from UV light of different frequencies. For example, 365nm registers as yellow. Purple is 390-405nm and so on. I find this useful for “duotoning” while I shoot, choosing which colors go where and creating the basic foundation for the image which will then be further developed in post. It’s a lot easier when you control the colors from the beginning and give yourself something to work with. I work entirely with home-assembled UV-led lights, which you can buy in 100W power if you want (20W is perfect for me). I use these: 365nm, 380nm, 395nm. All produce distinctly different colors. Using LEDs also makes filtering much easier since you don’t have any IR light to begin with. I liked your page about the hot mirror filters, impressive attention to detail.
Mark