When taking photos for a 360° panorama, the nadir shot is the shot that looks straight down. Typically you remove the tripod from its position, then take the nadir shot handheld. In this article I'll cover some tips that I use when taking the nadir shots for my panoramas.
Take a down shot on the tripod
Unless you are extremely accurate at taking a handheld nadir shot at the exact position the camera was when it was mounted on the tripod, you are likely to get some parallax error between the handheld nadir shot and the rest of the panorama.
This can be partially fixed by using the Viewpoint correction in PTGUI. But this will also make any points at a lower or higher elevation than where the control points were placed even more out of sync.
Depending on how offset your handheld nadir shot was, you may also have problems with the nadir shot becoming overly stretched (and so soft) in certain points of the image.
The solution is to take a nadir shot with the camera still mounted on the panohead before you move the tripod, then take a normal handheld nadir shot as well. You now only need to worry about masking in the handheld nadir to cover the small area covered by the tripod.
Assuming you placed the tripod on a relatively flat surface, you don't have to worry about any bending verticals caused by viewpoint correction of the offset handheld nadir. And any stretching caused by the handheld nadir being offset should be limited because you only have a small area to patch.
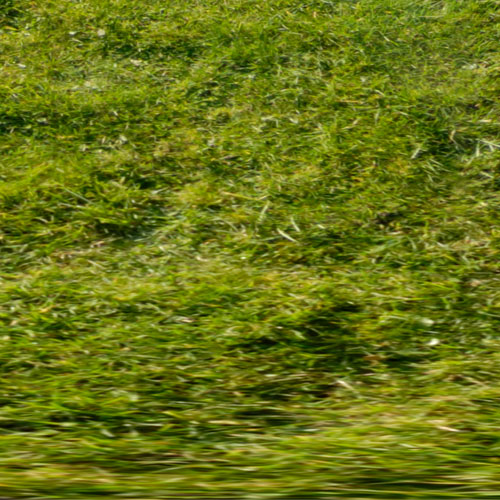
The handheld was offset in this instance, which has resulted in a stretching, and so blurring, of the nadir image when used to patch the panorama
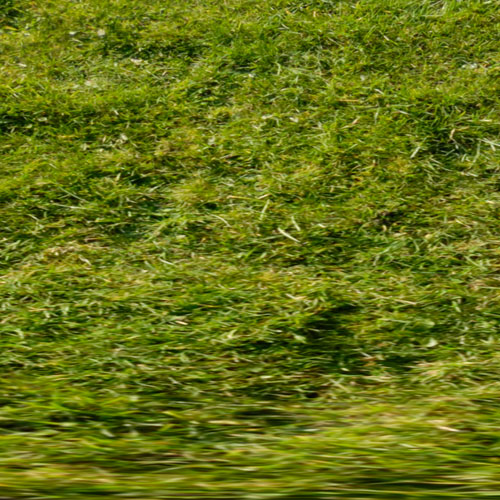
As above, but this time also including a nadir shot taken on the tripod. Because of the shot taken on the tripod, the nadir area to be patched with the handheld image was much smaller, so less of the stretched handheld nadir image has to be included
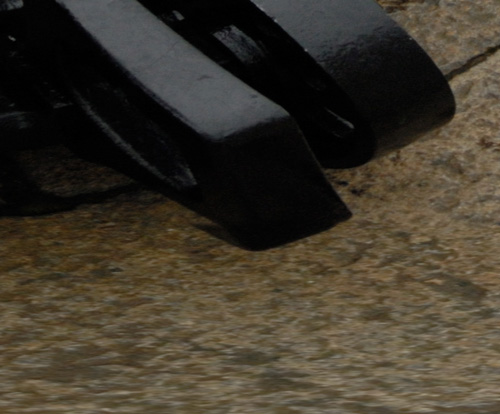
The handheld was slightly offset in this instance, viewpoint correction was used to correct for this, but this has resulted in a problem blending the bottom of the canon (the black object), which was at a higher elevation than the ground
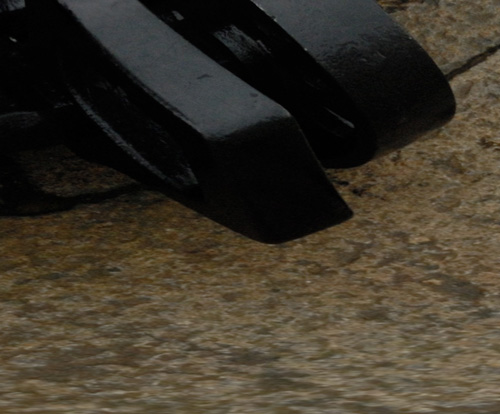
If we take a nadir shot down on the tripod, this means the canon bottom can be blended from this shot. The handheld nadir image is only needed to remove the small area where the tripod was standing.
This tip is only useful if you using a lens that doesn't have a wide enough FoV to already include the edges of the tripod in each 'around' image. If you are using a 10mm fisheye on an APS-C camera, or a 15mm/16mm/17mm fisheye on a full frame camera, the above tip should be useful.
Stand behind the arm of the pano head
When taking a nadir photo on the tripod, stand behind the arm of the panohead. This ensures that your feet aren't taking up any of the image, and you won't need to bother masking them out when putting the panorama together.

Nadir photo taken on the tripod while not standing behind the panohead arm
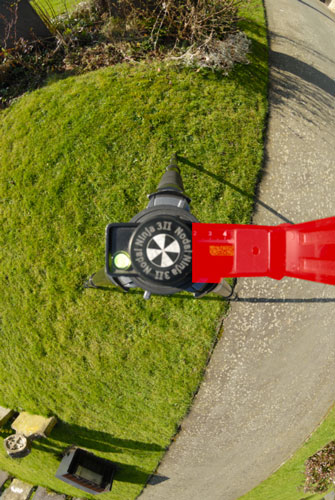
Nadir photo taken on the tripod while standing behind the panohead arm
If you're wondering why the panohead arm and your feet should be masked out, this is to prevent them being included and blended in with the rest of the panorama. You can do the masking in Photoshop using an alpha channel (and saving as a TIFF file) or the latest version of PTGUI has built in masking tools.
Stand so your shadow doesn't go across the nadir
When taking the nadir shot, try and position yourself so that your shadow doesn't fall on the nadir area that you will need to patch. This will save you the job of having to clone out the shadow in Photoshop.
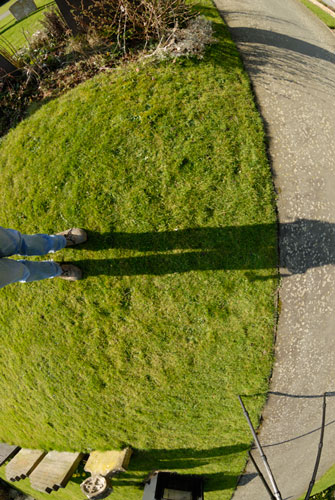
Nadir photo taken not paying attention to shadow
A nadir photo with your shadow in it will result in a panorama that requires a lot of cloning to remove the shadow
If you can't avoid your shadow being in the nadir, take two nadir shots from different positions so that your shadow will be in a different area in each image. Then use both nadir shots when processing the panorama, and mask in the areas from each shot to avoid any shadow.
If a slow shutter speed is needed, boost the ISO
Don't forget to check your handheld nadir shots when taking them, to make sure that the shutter speed is fast enough to prevent blur. I find I often need a shutter speed faster than the standard rule of 1/35mm equiv. focal length for a sharp handheld nadir image.
A noisy nadir shot is much better than a blurry nadir shot. If you are shooting with a relatively slow shutter speed, boost the ISO when taking your handheld nadir shot, and increase the shutter speed by the same amount, e.g. increase ISO by 2 stops, increase shutter speed by 2 stops. I sometimes open up the aperture slightly as well (and increase the shutter speed accordingly).
With a detailed nadir, the texture of the stone, grass, etc. will help hide any noise from your handheld nadir shot. And, of course, you can always apply noise reduction to your handheld nadir shot if necessary.
I have some panoramas where the main images were taken at ISO100, and the handheld nadir at ISO800. When patched, I can't easily tell which section of the nadir was shot at ISO800 and which was shot at ISO100. This is with the D200 as well, results with more modern cameras would be even better.
Crop of part of a nadir patch. The tripod images were taken using ISO100, while the handheld shot used for the patch was using ISO800. Can you tell?

Here the ISO800 patch area is selected (the bottom half).
If the nadir has no texture, then likely noise would become visible. In this case you may be better just cloning or painting the nadir in using Photoshop.
If a really slow shutter speed is needed, take two offset shots on the tripod
If boosting the ISO still won't get you a high enough shutter speed to take a handheld nadir shot, you can take two shots down on the tripod instead. Take one shot with the tripod offset to one side, and then another shot with the tripod offset to the other side.
When processing the panorama, you will need to apply viewpoint correction to both these shots. I would recommend you also take a down shot on the tripod without the tripod offset at all, as per the first tip in this article.
You can then mask out the tripod from each of the offset nadir shots, and end up with a clean nadir.

Panorama with nadir taken on tripod
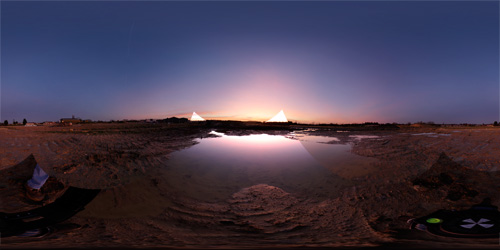
Panorama with first offset nadir taken on tripod
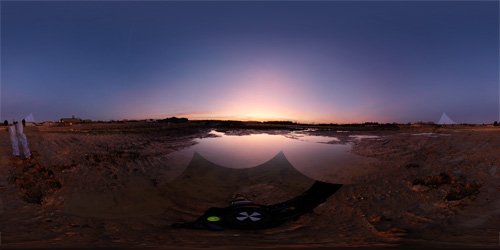
Panorama with second offset nadir taken on tripod

Image after patching with the offset nadir images
Other tricks for long exposure nadir shots
Hans Nyberg has a couple of pages on his website covering How to take a perfect NADIR image for spherical panoramas without taking the camera from the panohead, and How to take the Nadir.
If you have a tripod where the vertical column can be converted into a horizontal column, such as the Manfrotto 055XPRO, you can extend the horizontal column out. Offset the tripod so that the camera is kept in the same position as when the centre column was vertical, and you should be able to take the nadir photo on the tripod without the tripod getting in the way.
If you like taking 360° panoramas, then I hope this article has given you a few tips. I don't always remember to do these things myself, but then I kick myself when I have to spend time carefully cloning my shadow out of the nadir or something similar. Taking a little longer in the field can make for quite a bit less work when processing the panorama.
thank you. this is perfect.+++