About a week ago I decided to try taking some landscape style photos in ultraviolet, using my Fuji IS-Pro camera with the Baader U Filter. While I have taken a few UV flower photos so far, I hadn't attempted any landscape style photos.
I found a nice area of grass with quite a few dandelions flowering in it. I thought this would make a good subject for the UV photograph, since dandelion flowers appear darker under UV light than they do under visible light.
For photographing flowers in UV I nearly always use flash. This ensures a fast exposure. Without flash I need a longer exposure, which can result in the flower blurring if it is blowing in the wind.
For a landscape photograph, flash is out of the question. There is no way you could light up a whole landscape with flash. Unfortunately it was also windy when I took these photos, but you have to work with what you've got.
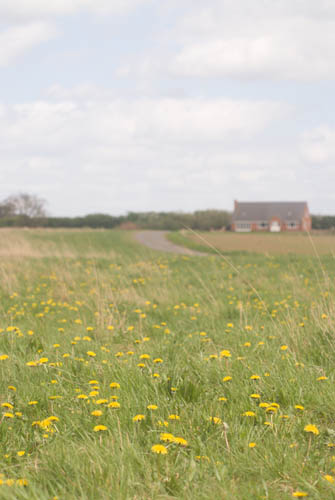
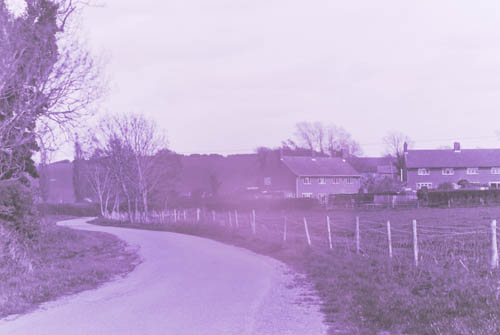
Visible light image f/5.6, 1/100s, ISO100 (-1.35EV in ACR)
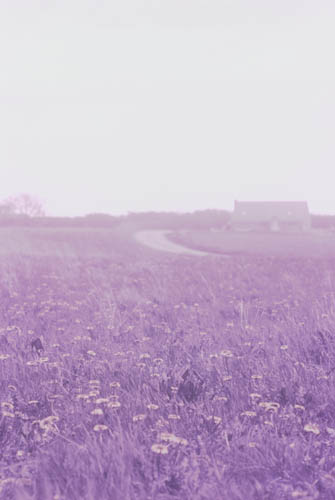
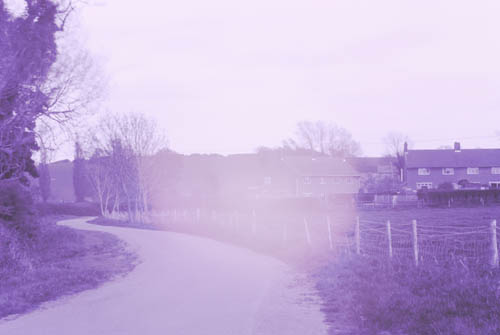
Ultraviolet light image f/5.6, 15s, ISO100 (-3.05EV in ACR)
The first thing you'll probably notice is that the sky is completely blown out in the Ultraviolet photo. Taking a photo that is exposed to get some detail in the sky in UV results in the rest of the image being very underexposed. And there is not much contrast between the clouds and sky to see anyway.
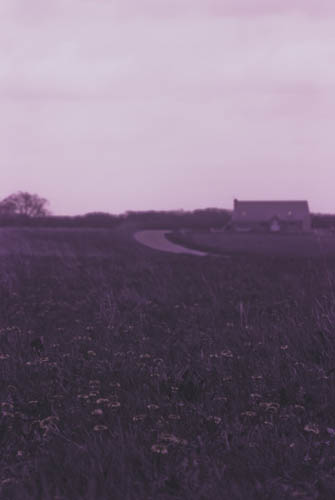
UV image exposed for sky
You can also see that the UV image is quite hazy in the distance. This is why UV cut filters are sometimes known as haze filters - by cutting out UV light, you cut out haze. So it is to be expected that a UV photograph would be more hazy in the distance.
I also took an infrared photo as well. The dark areas amongst the dandelions are flowers that have finished flowering and have closed up.
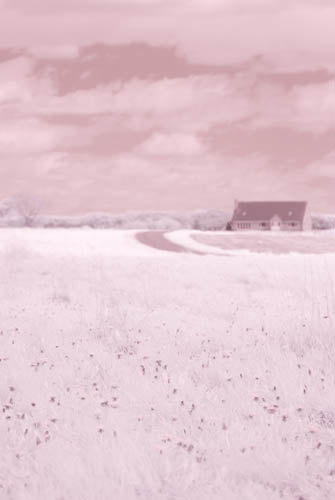
Infrared light image f/5.6 1/200s, ISO100 (0EV in ACR)
Back at home I then combined these three images into a single image. To do this I add all the images to a single Photoshop document. I hide the top layer, and set the middle layer to 50% transparency. Then I use the move tool to align it with the bottom layer. When aligned I put the opacity back to 100%.
Then I repeat the same process with the top layer to align that as well.
Next I do a copy merged, and create a new document. The new document will default to the size of the copied image, which is why I use copy merged rather than copy. In the new document I switch to the channels view, and paste the image into one of the channels.
For most images I will copy the infrared image into the red channel, the visible light image into the green channel, and the ultraviolet image into the blue channel. This creates the multispectral image.
After doing this I switch the view of the new document to RGB and copy the image, then paste it back my other document that contains the UV, IR, and visible light images.
Because it was a windy day, and I wasn't working very quickly when taking the photos, the clouds had moved quite a lot between the visible light photo and the infrared light photo. This created strange colour artifacts in the sky of the combined image due to the differences in cloud positions.
To get a nice sky, I used the infrared image as a layer above the multispectral image, applying a mask so just the sky was showing. I then clipped a cyan colour fill layer in hue blend mode to it. This keeps the cyan colour of the multispectral image's sky.
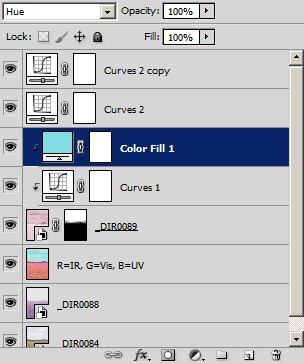
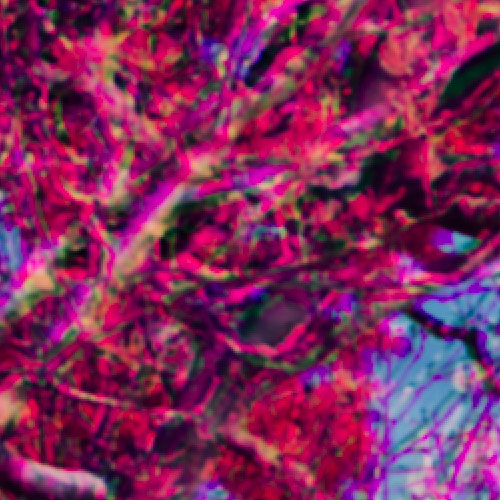
I added some curves to boost contrast and colour as well. The final image is below:
![Dandelions in the grass by East Farndon Road [Multispectral]](https://static1.davidkennardphotography.com/Img/smallWebSize/3827-Dandelions-in-the-grass-by-East-Farndon-Road-%5BMultispectral%5D.jpg)
After doing this, I wondered what effect the ultraviolet image was actually having on the final image. So I created another new RGB image. This time I used the visible light channel for both the green and blue channels, and infrared for the red channel.

The image above shows a comparison between the two images. The left image is comprised of the Infrared (red channel), Visible light (green channel) and Ultraviolet (blue channel) images. Whereas the right image is just Infrared (red channel) and Visible light (green and blue channels). There isn't a large difference.
The Dandelions are white / neutral rather than yellow, and the hedge in the distance is red rather than purple. But the grass is still red and the sky is cyan.
So, you can produce an image in the same style with just a visible light an infrared light image.
Further on in my walk I came across another scene I thought would make for a nice photo. The only problem was, I really wanted a reasonably wide angle to get the shot I could see. The only wide angle lens I have that I can use with the IS Pro is the Nikkor 18-70 mm.
I couldn't use this lens though because my UV filter is too small (would cause really bad vignetting). The Baader U filter is 49 mm, while the filter size of the 18-70 mm lens is 67 mm. This makes me wonder if a micro four thirds camera would make a good UV camera. They have small lenses, and presumably small filter sizes.
Anyway, I had my Nikkor 50 mm lens with me, so I figured that was at least wider than then my 80 mm EL-Nikkor I used for the first shot. Even with the 50 mm lens I had to stand in weeds at the corner of the road and the view was tighter than I would have liked. (The IS Pro is a 1.5x crop camera, so the 35 mm equivalent focal length was 75 mm).
I discovered that this lens (Nikon 50mm f/1.4 D) has a strong UV hotspot. It doesn't seem to have an IR hotspot though.
When processing this image, I applied heavy negative exposure compensation to darken the image. Then I applied very strong vignetting correction to brighten the edges of the image back up. Then I also used an adjustment brush to paint a bit more negative exposure compensation over the hot spot. The result isn't perfect, but is quite a bit better than without the adjustments.
With this image I created the multispectral image, then used the IR image (with red and blue channels swapped) above in multiply blend mode. This adds contrast. I adjusted the curves as well. So you can still see strange colour artifacts in the sky from the difference in the cloud positions between the IR and visible light images (the sky is blown out in the UV image and so doesn't make any difference).
![Lubenham Road, East Farndon [Multispectral]](https://farm8.staticflickr.com/7429/8726317535_71da8ca4d4.jpg)
There are also lots of colour artifacts, especially near the edges of the image, due to mis-alignment of the images. (This has to do with camera movement, trees blowing in the wind etc, and difference in focus between IR, UV, and visible light). But these are quite small, so probably won't be visible in the web size image. They look a bit like really bad CA or an anaglyph image when viewed close up.
200% crop near left edge of image
I think the IR image works well on its own for this last image.
![Lubenham Road, East Farndon [IR]](https://static1.davidkennardphotography.com/Img/smallWebSize/3828-Lubenham-Road%2C-East-Farndon-%5BIR%5D.jpg)
That is really really awesome! Since I saw this, I made a few Visible light and Infrared light combined photos, but that purpelish look you have thanks to your UV pass filter does make yours look more interesting I think :p Also, you could try using a perspective tool to line up the photos better. It does take a lot longer to proces, but the end result is more pleasing I think.
One last thing, how do you get your photos that bright? All multispectral photos I made, were really quite dark. I know why, but I don’t know how to help it :s I simply made the IR photo completely red, so that what’s white becomes red, and what’s black remains black, then I get rid of the red colour channel on the V photo, and simply place the IR photo with 50% opacity over the other one. But since that’s not the same as actually giving a new red channel to the other photo, it ends up really quite dark. It’ll just take the average of the 2 photos, so even if the red photo is red 255, and the other photo has green and blue at 255, since those colours don’t exist in the other photo, it’ll make the end colour grey, rather than white. R= (255+0)/2 = 128
G=128
B=128
While it should all be 255.
Do you know anyway to get around that?
Hi Max
I think what you are probably looking to do is a channel swap. For this you need to open both the IR and Vis images in Photoshop. In the IR image select all and copy. Then go to the Vis image and view the channels palette. Select the red channel and paste in the IR image. This should now give you an image where R=IR, G=G, B=B. It should be brighter than the normal Vis image, since the IR image is likely to be brighter than the visible light red channel.
I am pretty sure there is also a way to do this using layers, it might involve using colour adjustment layers and the blend-if options. But I can’t remember off the top of my head. I’ll see if I can find the info and let you know.
Regards
Dave
This was what I was thinking of in regards to layers, though having just tried it, it gives different results to using the channels method: http://varis.com/2013/08/19/the-new-cc-false-color-technique/
Firstly, thanks for the reply.
Secondly, I don’t have photoshop unfortunately, I use GIMP to edit most photos.
Lastly, maybe not my best move ever, but I started looking for a function that could fulfil what I described in my comment after posting the comment. It only took some five minutes to find it =w=
But yes, indeed, R=IR, G=G, B=B worked splendidly, though, at first it didn’t because of the photos not all being the same format after aplying perspective corrections. After a simple cropping it worked though.
Thanks for the info though! ^o^